CATO SECURE ACCESS FOR WFH EMPLOYEES
CATO Secure Access Phases
As part of the implementation of the OP360 Secure Access Service, we are deploying the secure connectivity tool from CATO Networks in phases.
Phase 1: CATO Secure Access Deployment
- CATO Client Agent Installation
- Device Compliance Check
- Multi-Factor Authentication (MFA)
Phase 2: Test Access and Security Policies
- Remote User CATO Networks Access Test
Phase 3: Restrict access to AllSec Check-In / Check-Out
- Once deployment is complete, CATO Secure Access will be required to access AllSec Check-In / Check-Out from outside the office.
Overview.
Phase 1:
-
CATO Client Agent Installation Overview
- Automatic Deployment of the Cato Client agent by Endpoint Central
- Manual Deployment of the Cato Client agent
- Download the Cato Windows Client
- Install the Cato Client on your Windows device
- Check if the Cato Windows Client is installed in your device
- In the System Tray
- In the Windows Search Box
- In the Windows Menu applications
- Device Compliance Check Overview
- Multi-Factor Authentication (MFA) Overview
- Open the Cato Client Application
- Connect to the Cato Network
- For First Time Users
- Setup Microsoft Authenticator for MFA.
- Cache Credentials
- For Subsequent Logins
- Cato Client will connect automatically with the Cached Credentials
Phase 2:
- Remote User CATO Networks Access Test Overview
- Remote WFH User must be able to access the test CATO network URL
- A successful message must be displayed
___________________________u______________________________________
Detailed Steps and Procedures.
Phase 1:
- CATO Client Agent Installation
- Automatic Deployment of the Cato Client agent by Endpoint Central
- During Phase 1, the CATO Client Agent was deployed via Endpoint Central to all WFH computers starting on the first week of January 2025.
- Automatic Deployment of the Cato Client agent by Endpoint Central
- Manual Deployment of the Cato Client agent
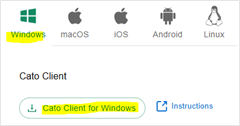
Download the CATO Windows Client.
-
- From a browser, open the Client download portal, and select the Windows tab.
- From a browser, open the Client download portal, and select the Windows tab.
-
- Click Cato Client for Windows. The Cato Client setup file is saved to your device. Note where it was saved.
Install the Cato Client on your Windows device.
-
- Open the Cato Client for Windows setup file that you downloaded and follow the steps in the installation wizard.

- Open the Cato Client for Windows setup file that you downloaded and follow the steps in the installation wizard.
Check if the Cato Windows Client is installed in your device
To check if the Cato agent is installed, look in the following areas of your computer.
- In the System Tray.
- Click on the up-arrow icon on the bottom-right corner of the taskbar.
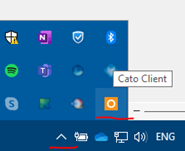
- Look for the orange square with the white ring and hover the mouse over it. It should say “Cato Client”.
- Click on the up-arrow icon on the bottom-right corner of the taskbar.
- In the Windows Search Box.
- Type “Cato Client” in the Windows Search Box.

- The Cato Client app should appear on the Windows menu.

- Type “Cato Client” in the Windows Search Box.
- In the Windows menu applications.
- Click on the Windows icon and scroll for the Cato Networks -> Cato Client item.
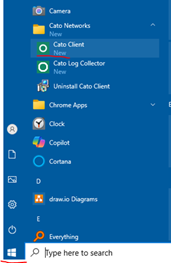
- Click on the Windows icon and scroll for the Cato Networks -> Cato Client item.
- Device Compliance Check
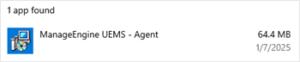
- Endpoint Central AND CrowdStrike agents must be installed.
- In Windows Settings and Apps & Features, search for the Endpoint Central ManageEngine UEMS agent application.
- In Windows Settings and Apps & Features, search for the CrowdStrike agent.

- If one or both agents are not installed, an error will be displayed when connecting to CATO Networks.
- In Windows Settings and Apps & Features, search for the Endpoint Central ManageEngine UEMS agent application.
- Endpoint Central AND CrowdStrike agents must be installed.
- Multi-Factor Authentication (MFA)
- Open the Cato Client Application
Note: DO NOT open the Cato Client on your mobile device. It will be blocked anyway.
- Open the Cato Client Application
-
-
- From the System Tray.
- Click on the up-arrow in the System Tray and right-click on the Cato Client icon and click on Open Cato Client.
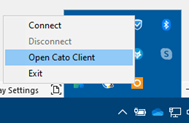
- Click on the up-arrow in the System Tray and right-click on the Cato Client icon and click on Open Cato Client.
- From the System Tray.
- From Windows Search Box.
- After searching for Cato Client, click on the Cato Client icon app, or click on Open or click on Run as Administrator.
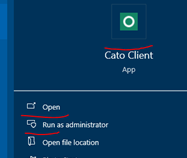
- After searching for Cato Client, click on the Cato Client icon app, or click on Open or click on Run as Administrator.
- From Windows menu applications.
- Click on the Cato Client icon in the menu.
- Click on the Cato Client icon in the menu.
-
- Connect to the Cato Network
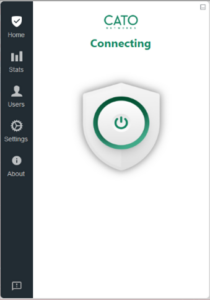
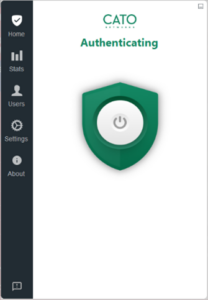
- Click on the Power or Connect button.
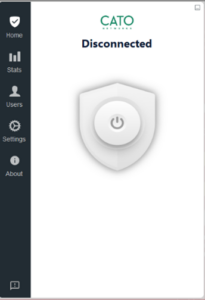
- The client will begin to Connect and Authenticate to CATO network.
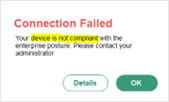
- Device is Not Compliant.
- If your computer does not have Endpoint Central and Crowdstrike agents installed, you will receive this message and will not be able to proceed.
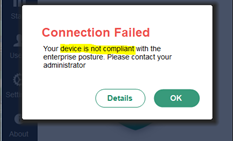
To fix this, have the Endpoint Central agent and Crowdstrike Falcon agent installed on your computer. You may reach out to IT Operations personnel and/or file a Freshservice ticket. Resume when compliant.
If device is compliant, proceed with #3. Below.
- If your computer does not have Endpoint Central and Crowdstrike agents installed, you will receive this message and will not be able to proceed.
- Click on the Power or Connect button.
- For First Time Users
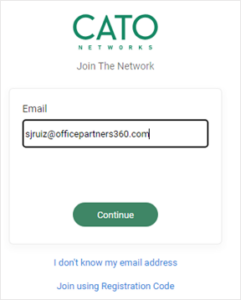
Users connecting for the first time to CATO networks will have to set up Microsoft Authenticator for Multi-Factor Authentication.
-
- Setup Microsoft Authenticator for MFA
Type your complete email address and click on Continue.
- If Cato prompts for the Subdomain, it means that you are not licensed to join the Cato network. Inform your manager and file a Freshservice ticket for a license.
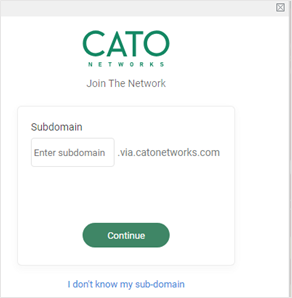
- For now, click on the X icon on the top right of the message box to close the Cato Client app.
- Proceed if you have a Cato license assigned.
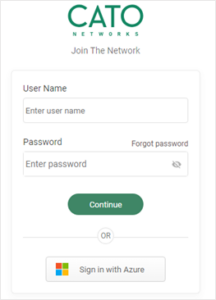
- Sign in with Azure.
- Type in your User Principal Name (UPN) which is composed of your Active Directory Username or NT Login name plus the domain name. Example:
Login name: sjruiz
Domain name is always: @officepartners360.com
Resulting UPN: sjruiz@officepartners360.comNote: This is not your email address which can be personalized and different from your Login Name.
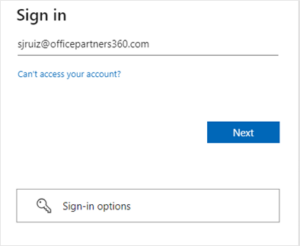
Disregard the Sign-in options. Click on Next. - Note: Cato MFA will work with the Microsoft Authenticator app only. Click on Next.
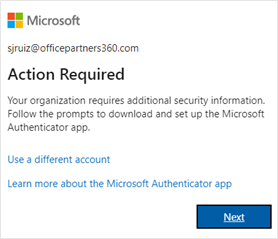
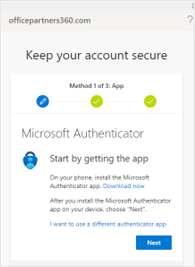
- Install the Microsoft Authenticator app on your mobile if you don’t have it yet. You may download the installer from Google Play or Apple Store. Click on Next after installation. You may reach out to Desktop IT or IT Operations for assistance in the MFA installation and setup. Alternatively, you may file a Freshservice ticket.
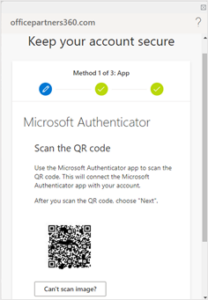
- Open the Microsoft Authenticator app on your mobile device and scan the QR code on the screen.
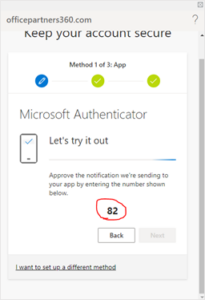
- Enter the Cato provided verification number into the Microsoft Authenticator app on your mobile device.
- Authorize on the mobile Microsoft Authenticator app and click on Next.
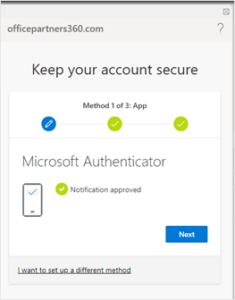
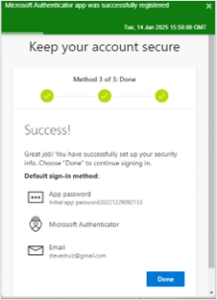
- MFA is successfully set up. Click on Done.
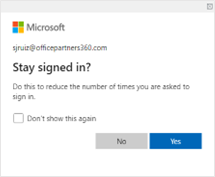
CACHE YOUR CREDENTIALS. Check Don’t show this again and click Yes. This will minimize the frequency of you having to login your credentials again.
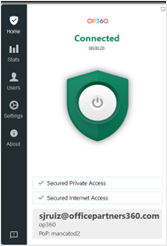
- You are now successfully connected to the Cato Network.
- Setup Microsoft Authenticator for MFA
- For Subsequent Logins
Users who have already Setup Microsoft Authentication and have Cached Credentials, will automatically be logged in to Cato Network after clicking on Connect. Just open the Cato Client and click on the Connect or Power-on button.
You should automatically be logged in to the Cato Network.
Phase 2: Test Access and Security Policies
Once all WFH employees have successfully logged into CATO, we will proceed with Phase 2, which involves testing of access and restrictions.
- Remote User CATO Networks Access Test
Test the Secure Access page
-
- While connected to the CATO network, please access this URL https://test.officepartners360.com in a browser.
- You should be getting the message on the webpage “You are all set.” This mimics the restriction set on AllSec’s Check-In/Check-Out Module once we go live in Phase 3.